I had settled on a 4 day trek of Mt Meru. You can do it in 3 days, but that leads to having some real long days in order to get into the park, up to the summit, and back out in such a short time. The 4 day trek was a much more relaxed pace and would give me more time at the higher elevation to acclimatize for this trek and for Kilimanjaro. A little more expensive, but I was in no hurry. Pole pole.
The night before the Mt Meru trek began, I was greeted by the guide for my Mt Meru trek, Qassim. The trek would have 3 people on it (including me), 2 guides, and about 8 porters to carry our gear, food, and cooking gear. I had not met the other two hikers before, but it was cheaper if others were on the trek with me. Being used to backpacking with everything on my own back, having a large crew with me was a bit unusual and felt odd at times, but you’re required to have a guide and I did have a similar caravan in Peru during my Salkantay to Machu Picchu trek. Since my focus was on climbing the mountains, I accepted the luxury of not having to carry everything myself and eating non re-hydrated food for 4 days. How I suffer for my hiking passion. 🙂
Plus, on Mt Meru you had to have an armed ranger escort you to deal with any wild animals that might get too close. In a sense, it was a mini-safari as well as a climb of a nice mountain.

Being an experienced backpacker, I had most of the equipment I needed for both treks already. I did get a few new things for these treks, including a new pair of convertible hiking pants to replace the well worn pair I finally ripped open on Mt Tyndall a month before I left for Tanzania. I also had to invest in several dry bags of various sizes. Normally, I’d rely on zip lock and garbage bags to separate, sort, and water protect some of my equipment, but Tanzania had just instituted a plastic bag ban. While I do support the idea of banning disposable plastic bags, it did require me to rethink how I organized my gear for treks like these.
Being a guided trip, they provide the meals and even some snacks. I still packed a good deal of my trail snacks that I’m used to using on my personal treks and packets of powdered Gatorade so I could refill my Gatorade bottle over the course of the trek.
The first day was somewhat un-hurried. They picked us up from our hotels, picked up our porters and gear along the way, and then entered the Arusha National Park surrounding Mt Meru. Almost right away, we spotted some cape buffalos in an open field. And then zebras, giraffes, warthogs, and more. Oh my! No lions, tigers, or bears (the latter two not being native to Africa anyway). Despite the pictures of elephants for day 1 that you’ll find in my Flickr album, we did not see any (the pictures are of an elephant statue near the park entrance).

Then we arrived at the trailhead gate (Momela Gate at a relatively low 5,240 feet altitude) and waited.
And waited.
We had to wait for the armed ranger, but because they picked us up relatively late and made the stops along the way, it was mid-afternoon before we actually started the day’s hike. I found that a bit annoying. If it was a further distance to the park or the start times were scheduled by the park, maybe it would have been okay. But since the rangers were assigned on a first come-first served basis, if we had gotten to the gate earlier, we would likely have gotten an earlier start. The late start made the 8 and half mile hike that afternoon seem very rushed and I’m still not sure we did the full ‘long trail’ that was described in the guidebook.
Trying not to dwell on that, I enjoyed the baboons we saw along the way, the arched fig tree that you can walk through (it’s a natural arch, not carved out like some of the California tunnel redwoods), and a few glimpses of Mt Kilimanjaro.

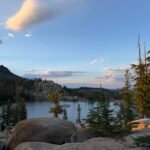
We reached the Miriakamba Huts (8,322 feet) very close to sunset. About five to ten minutes after we arrived, the skies opened up in a sudden downpour.
Fortunately like Mt Fuji and the Japan Alps, they had mountain huts for hikers to stay in. This kept us dry as we had dinner and settled in for the night. The bunk beds did have nice thick mattresses and pillows, so I didn’t have to use my air mattress or air pillow that I had brought.
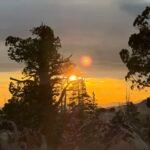
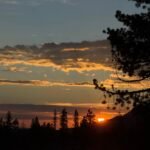
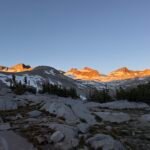
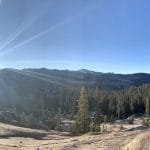
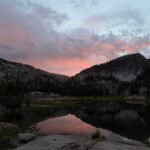
The next morning, I woke up before dawn (I always seem to wake up before dawn when hiking) and I had the pleasure to see the sun rising near Kilimanjaro. Clouds covered most of the lower part of the maintain and prevented me from seeing the actual sun rise over the horizon, but the light show was still fantastic.


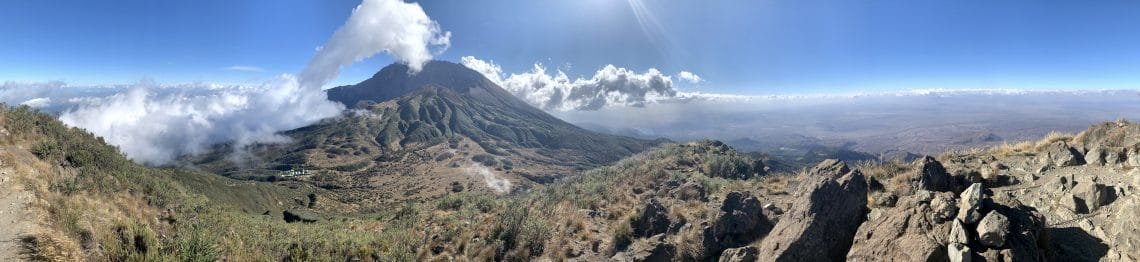
Especially over the face of Mt Meru! Very similar to how the setting sun splashes a golden glow across the face of Yosemite’s Half Dome, the rising sun cast a golden glow across the face of the crater wall that faced the hut. From the peak that held Mt Meru’s summit down to the ash cone, everything was lit up beautifully. I’m glad I saw it when I did because the clouds moved in shortly after and obscured much of the crater wall and Kilimanjaro soon after.

After a very hearty breakfast, we started up towards the next night’s destination: Saddle Huts (11,680 feet)
These huts are (naturally) situated on the saddle of Mt Meru that connects to Little Meru (12,470 feet). One odd design decision of the Saddle Huts was the decision to put the bathrooms on the side of the area facing Kilimanjaro. So you could see the view over the tops of the bathroom building or walk past the bathrooms to see an unobstructed view of Kilimanjaro. On top of that, the dinning room building has windows on two sides, but not on the wall facing Kilimanjaro. It would have a perfect view if they put some windows on that wall (and the weather cooperated, which it did a little that day). Maybe windows couldn’t handle the wind or other weather that would hit it from that direction, but it seemed like an odd design choice.

After a brief rest for lunch there, we headed up Little Meru for a short acclimatization hike. A very enjoyable hike and great views of the area, including a view of the trails we would be taking the next morning. Sometimes it’s better not to see how you will be getting up a mountain. 🙂

Since the hike up to the summit takes a long time and to hopefully to see the sunrise from or near the summit, the next day we started out around 1am. Having hiked up Mt Fuji, Mt Shasta, and other mountains with only a headlamp to light the way, this wasn’t a new experience for me. But it’s not easy to make your way along an unknown trail in the dark. Fortunately, the guides could assist us with finding the correct route and kept us heading up.
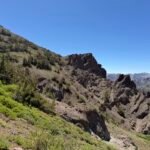
The first part was a lot of switchbacks up to Rhino Point. And I just “love” trails with switchbacks. 🙂
Rhino Point is the first landmark you have to reach on the way to the summit, but because we were in the dark, all we saw was a sign. Group photo time! For the life of me, it seemed like Rhino Point was surrounded by rock walls. More on that impression later.

Then the cables and chains appeared.
Funny, the guide books and trail descriptions I read didn’t seem to mention the need to use various chains embedded in the mountainside to pull your way up towards the summit. Somewhat similar to the Half Dome cables (although not strung up vertically), they allowed you to make your way around narrow ledges and pull yourself up several rock faces that didn’t have adequate footholds otherwise. Having experienced and used similar chains in the Japan Alps this wasn’t new to me. Doing it in the dark was somewhat unique. At least they didn’t have a portion where you hung onto a chain for dear life as you inched your toes along a tiny 1-2 inch ledge that separated you from certain death like I had the fun of navigating in Japan. 🙂
Chains behind us, the light from the sun started to light up the area around us. Unfortunately, all we saw was the inside of the cloud that we were climbing up into. Not fog. At that altitude, you’re just inside the cloud itself. No rain, but a fine mist that blocked much of the view. No sunrise for us. 🙁

Of course, then the problem becomes finding the bloody summit.
False summits are a fact of climbing mountains. They are basically what looks like the summit you are aiming for, without actually being the true summit. Add the cloudy mist that we were hiking through and we had a lot of false summits to ‘enjoy’ on our way up.
A radio tower was our worse false summit since it kind of looked like the metal flag we were expecting to see on the summit. I bet that was built intentionally just to screw with climbers. 🙂
Shortly after that another false summit appeared…
Wait… that really is a metal flag!! GOAL!! 14,980 feet!

After the flag, the summit sign came into view and we knew we had actually reached the summit! Many pictures were taken, but unfortunately not of the glorious views surrounding the summit. The weather would prevent that. So I only have hundreds of photos from day 3 instead of thousands. 🙂
14,980 feet. The second highest I had ever been able to reach on the Earth (it replaced Mt Whitney as my previous second highest altitude reached). Except for the disappointing view, it was a pretty straight forward hike and climb to reach the summit. No signs of altitude sickness or headaches.

Getting down would end up being much harder.
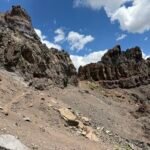
The mist gave way to actual rain as we made our way down. We could see more of the area on the way down, but the rain was making the rocks slick and it was hard to find a good foothold most of the time.


Upon finally returning to Rhino Point, I was amazed to find it was a wide open peak on the crater wall. It was so odd that in the darkness I was sure it was surrounded by rock walls.
The chains didn’t help too much in the rain. It was slow going for our group, but we did safely make it back to the Saddle Huts. The next best thing to reaching a summit is to get down from it alive. Success on both fronts. 🙂
The schedule called for us to have lunch and then make our way back to the Miriakamba Huts for the night. Since it took us so long to descend in the rain, our group was very much in favor of staying at the Saddle Huts another night. One of the drawbacks of a guided trek is that you are sometimes forced to stick to a schedule that might not make as much sense based on trail and weather conditions.
So we had another 4 miles to descend before we could sleep. We did it, but our bodies weren’t too happy about it. The lack of photos during this time also showed how much I was focused on just getting down to a bed. 🙂
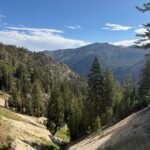
After another night at Miriakamba Huts, we had a very short 5 miles to descend using a shorter trail than we had taken on the way up. It was a nice change from the hard hikes up to the mountain huts and the very hard summit climb and descent.

Then we hiked into a tower of giraffes (tower is the term for a herd of giraffes). A large group of Giraffes had wandered across the trail and we were rewarded by being able to see these majestic creatures up close as the walked by us. Probably closer than you can see them in a zoo.


Some more cape buffaloes, zebras, and warthogs finished our mini-safari on the way down to the gate.
Back at the gate, I had my usual celebratory Coca-cola and we got certificates for reaching the summit of Mt Meru and even for climbing to the top of Little Meru. The later was a surprise, but I think they have that certificate since reaching the top of the main summit is very difficult and many people aren’t able to accomplish that.
So just a little over 36 total miles and 9,740 feet elevation gain over the previous 4 days got me to the first major goal for this trip. Except for the rain on summit day, it went pretty good and the sunrise on day 2 was very much a great experience to add to the elation of reaching the summit.
But I was hoping that Mt Meru would not stay as the second highest point that I had reached on Earth for very long.
Onward and upward to the top of Mt Kilimanjaro!! At 19,341 feet, it is over 4,300 feet higher that Mt Meru and 3,000 feet higher than Incachiriaska Pass.
This was not going to be easy…
…but that’s what makes it fun and worth trying to do. 🙂
Day 1 – Start at Momela Gate 5,240ft. 8 1/2 miles via long route to Miriakamba Huts (8,312 feet).
Day 2 – Start at Miriakamba Huts (8,312 feet). 5 miles to Saddle Huts (11,680 feet). Short acclimatization hike to Little Mt Meru (12,470 feet).
Day 3 – Start at Saddle Huts (11,680 feet). 3/4 mile to Rhino Point (12,710 feet). 3 miles to Summit (14,980 feet). 3 miles back to Rhino Point (12,710 feet), 3/4 mile back to Saddle huts (11,680 feet), and 4 miles back to Miriakamba Huts (8,312 feet).
Day 4 – Start at Miriakamba Huts 8,312ft. 5 miles via short route to Momela Gate 5,240ft.
_____________________________________________________________
A collection of all of my Tanzania 2019 Photos and Movies:
https://www.flickr.com/photos/wanderingjim/collections/72157711519926736/
Day 1 Highlights:

The rest of the photos:

Day 2 Highlights:

The rest of the photos:

Day 3 Highlights:

The rest of the photos:

Day 4 Highlights:

The rest of the photos:


1 Pingback